


Processing your own deer can be done with just a few simple tools. Read on for resources and instructions on taking your deer from the forest to the freezer.
Hanging and Skinning a Deer
This is the first step of processing. Hanging your deer helps keep the animal clean and allows you to use gravity to your advantage.
Hanging a deer
Tools you’ll need:
- Rope
- A rafter, tall tree, or other high place, at least 8 feet off the ground
- A gambrel or other stick to hold the deer’s legs apart
- An area to anchor the rope securely
- To hang the deer, hook your gambrel or stick into the gap between the deer’s Achilles tendon and the leg bone directly above the ankle joint.
- Throw a long piece of rope over your rafter, tall tree, or high place. Tie one end of the rope to the middle of the gambrel and pull on the other end of the rope to hoist the deer upward. Once the deer is entirely hanging, tie the rope to a nearby sturdy object, such as a tree, to hold the rope in place.
- You may need someone to help you lift the deer, as an adult white-tailed deer can weigh well over 100 pounds in Indiana.
- Instead of a tree branch, you can use the bucket of a tractor to hold the deer. Tie the deer to the bucket while it is lowered and raise it to lift the deer up easily. Be aware that the bucket may not be high enough for a large deer.
Skinning a deer
Tools you’ll need:
- A sharp, short knife
- A bone saw
- A tarp
- A water source
- Optional: A clean place to store the hide if you intend to keep it
- Remove the front legs at the joint. Take your knife and cut a circle down to the bone around the joint. Then, either snap the joint with a sharp downward motion or cut it off with your bone saw. This will help significantly with removing the hide later on.
- Cut down the inside of the rear leg, following the line made by the white fur and brown fur colors until your line meets the one down the chest of the deer. Cut both sides to form a Y. Face the blade of your knife up and try to cut the hide like a zipper, as this will keep the hair out of your meat and prevent you from cutting too deep.
- Put your fingers under the hide and pull the skin down the leg. If the skin isn’t coming off easily, cut with your knife right where the hide meets the flesh. Make sure not to use too much pressure, as this will punch holes in the hide.
- Once you reach the tailbone, cut through the tailbone at any of the joints. Then continue pulling the hide down the back and sides of the deer.
- Use your body weight to help pull the hide off the deer. As you work down the hide of the animal, it may help to adjust the height of the animal.
a. While you work on the skin, make sure you’re not swapping the hand that is working close to the meat versus the hand that is working the hide to limit hair transfer.
b. If the hide is hard to remove, you can place a golf ball or rock under the skin and tie a rope around the circle in the hide you’ve formed. Then you can pull the rope by hand or with a vehicle to help remove the hide. - As you pull the hide over the front legs, you’ll want to roll the hide down the legs, much as you would a sock. If you can, raise the carcass up higher at this point to give you more leverage when pulling downward.
- Continue rolling the hide down off the neck if you’re attempting to save the cape (hide) for a shoulder mount. If not, it can be beneficial to make a cut down the bottom of the neck, following the line made by the cut on the chest.
- When you get to the base of the head, stop there if you’re saving the hide and/or head.
- Cut through the flesh around the top of the neck. Place your knife on one side of the neck at the point closest to the head where the meat can be seen. Begin cutting through the flesh around the neck, rotating your knife around the spine until you have a complete cut through to the bone.
- Use the bone saw to saw through the neck and remove the head. Use a very sharp knife or a bone saw to cut through the hide at the base of the head. When it is fully detached, lower it to the ground. If you’re attempting to cape the deer for taxidermy, contact your preferred taxidermist to find out how they would like the hide cut and taken care of.
- Remove the pelt and wash the carcass with clean, cold water to remove any viscera or dirt that may have got on it during the process. Your hide and head should be completely removed. You can now put the hide in a cooler to work on later or dispose of properly. Wash any hair off the meat with cold water.
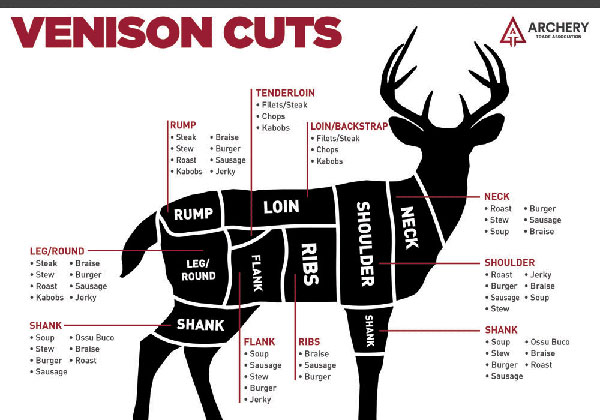
Quartering the Deer
Quartering your deer is the next step toward getting freezer-ready food.
Tools you’ll need:
- A clean workspace (such as a tarp on a kitchen table
- A place to store your deer quarters
- A sharp boning or fillet knife
- Rubber gloves
- An apron
- Place your skinned deer on the gambrel or another clean surface, such as a butcher’s table, and find the deer’s front shoulder. Pull up on the front leg and find the line where the shoulder muscles attach to the torso. Run your knife down this line, keeping the leg pulled away so that the tension and gravity will help separate the muscles. Once the shoulder is off, place it in a clean area to return to later. Repeat this step for the other front leg so that both shoulders are off.
- Remove the tenderloins from the inside of the ribcage. These football-shaped muscles are located under the ribcage and stretch from the middle of the ribcage back to the pelvis. Cut under them from the front and pull them loose with your fingers. These are the most tender pieces of the deer, known as the fillet on cattle.
- Take the backstraps off the animal. These are the large slabs of meat that run along the spine, from the neck to the hips. Use your boning knife to make a cut on one end of the backstrap, turning it to run along the spine. Work your knife as close to the bone as possible, much like filleting a fish. Once you get to the other end of the backstrap, cut up and remove the backstrap from the bone. Repeat this for the other side of the spine.
- Remove the neck roasts, going in a similar method as you did with the backstraps, making sure to remove the top and bottom meat. Be sure to cut and pull out the esophagus and trachea if you haven’t done so already.
- Remove the ribs and flank steaks, the flaps of flesh connecting the ribs. Take your knife and slice the ribs off by either cutting the meat off the ribs for grind, or using a bone saw to cut off the ribs for smoking.
- Remove the legs. A second set of hands may be helpful if you’re doing this on a gambrel. With your knife, find where the leg meets the hip, and cut down toward the ball joint. Remove the leg at the joint, which will make it easier to break down. Cut in a circle around the joint and pop the leg off. Note: Be careful. The legs are heavy. If the deer is hanging when you take its leg off, the rest of its carcass will drop suddenly, as the weight is now unbalanced. A second set of hands can prevent the deer from falling rapidly. Repeat this step for the other leg.
- Find the joint on the back legs where the lower legs meet the ankle bones, right below where you placed the gambrel. Then, take your knife and cut around the joint and snap the lower leg off to clean up the lower quarters.
Processing the Cuts
The next step is processing the quarters into freezer- or grinder-ready meat. Tools you’ll need:
- A sharp, short knife
- A sharp fillet or boning knife
- A clean work surface, such as a large cutting board
- Clean storage containers
- Freezer bags or other storage containers for freezers
- A cool workspace
Backstrap: Keep larger roasts or cut them into smaller steaks. Trim off any fat or silver skin, and then cut them into your preferred portions.
Tenderloins: Trim off any fat or silver skin. Be careful, as these pieces are tender, and being too rough with them can cause them to tear.
Hind quarter: Break down the hind quarter by finding the knee joint and cutting through it, which will leave you with the shank. This can be trimmed or grinded.
To remove the four remaining muscle groups, follow the natural seams between them. Use your boning knife and cut along the femur inside of the meat, cutting all the way around the bone. Pull the femur out. This will leave you with a 100% boneless venison leg.
Follow the membranes that connect the groups and cut those apart. These parts are known as the sirloin, which is round and hugs the front of the femur; the bottom round, which is the smaller piece on the outside of the leg; the top round, which is the larger piece about twice the size as the bottom round on the inside of the leg; and the eye of round, which is between the bottom and top rounds. Make sure to trim all fat off these pieces, as it has a bitter taste. You can keep these as roasts or cut them into steaks of the size you want.
Front legs: Remove the fat beside the neck. Similar to what you did with the rear leg, break the shank loose. Trim off the meat for grind or keep it.
Find the seams in the meat. Note that there is a ridge running down the length of the shoulder blade on which these muscles meet and attach to the bone. Run your boning knife down this length to separate two steaks or roasts from the leg, known as the flat iron. Trim off any fat or sinew and clean up the cuts. Any meat trimmings used during any of these processes can be used for grind. Cut these steaks your desired size.
Neck: To process the neck meat, remove the fat, lymph nodes, and silver skin. Then cut the neck meat into desired roasts or use them for hamburger or sausage.
Prepare your meat for the freezer by storing it in air-tight bags or containers.
You can watch several videos abot processing your deer here.
Download a copy of this guide here.